LTC Timecode Trigger Setup — Move Won't Fire on TC
Summary
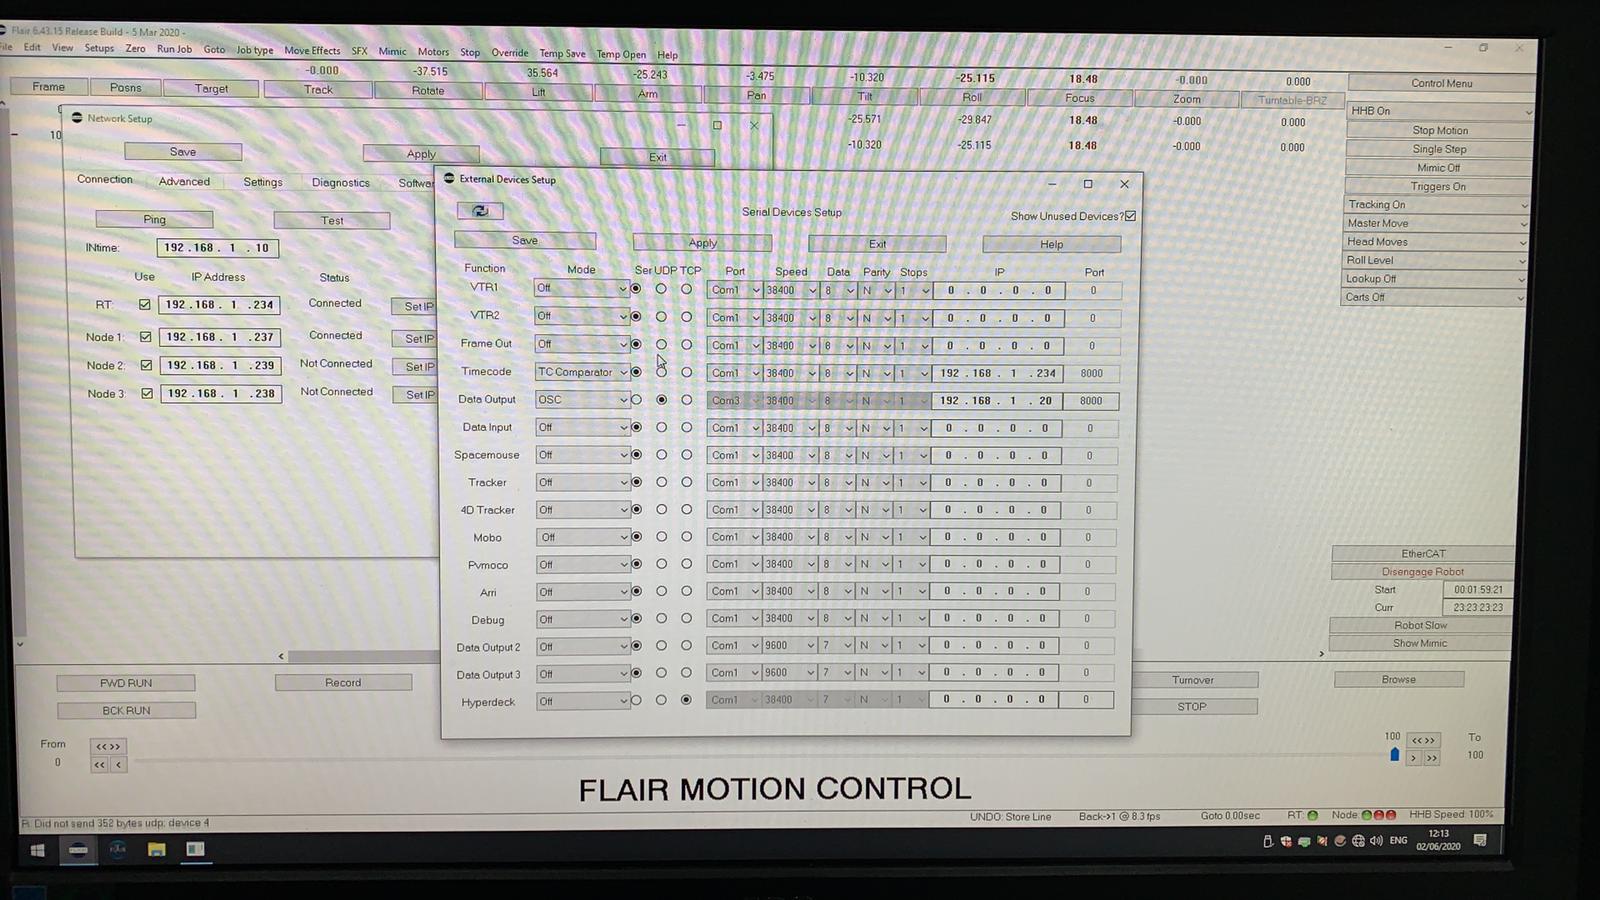
Flair can be triggered to start a move at a specific LTC SMPTE timecode value from an external source (e.g. music playback, QTAKE, LTC generator). Setup involves several non-obvious steps across multiple Flair windows. The most common failure: serial device mode must be set to TCP (not COM1 or UDP) for TC trigger to fire.
Symptoms
- LTC timecode is visible and ticking in Flair but the move does not trigger at the set timecode value
- Robot pre-rolls but then moves immediately without waiting for TC
- Timecode display freezes or halts when settings are changed
- Move fires from the START box in the main window but not from the Inputs Setup trigger
Technical Background
SMPTE LTC (Longitudinal TimeCode) is an audio-rate signal carried on the tip/ring of the RT14's 3.5mm jack input. Flair reads this via the RIC timecode reader (set in the INI file). Multiple Flair windows must be configured consistently for TC triggering to work.
Key insight: The TCP address in External Devices Setup appears to be non-functional (any value works), but the mode must be TCP — not COM1 and not UDP. UDP prevents timecode from reading at all.
Second key insight: After calculating the trigger point in the Inputs Setup window, the trigger point value must be manually copied to the START box in the main Flair window. It does not update automatically.
Setup Checklist
This checklist was developed by Stafford Wheaton and verified by Niko and Tom D (June 2020):
Where These Screens Are
| Screen / value | Flair location |
|---|---|
| Serial Devices Setup | Setups -> Serial Devices Setup |
| Timecode Setup | Setups -> Timecode Setup |
| External Camera Setup | Setups -> External Camera Setup |
| Inputs Setup | Setups -> Inputs Setup |
| Main START box | Main Flair run controls / main window |
1. Hardware Wiring — RT14 LTC Input
RT14 3.5mm jack pinout (SMPTE LTC input):
  SLEEVE  — GND
  RING    — Timecode signal IN  ← this is the active pin
  TIP     — NC (or tie to ring)
Half-plug trick
Some LTC cables (or TC generators with stereo output) have the signal on both Tip and Ring. The RT14 uses only Ring. If using a stereo cable and timecode isn't reading, try inserting the plug only halfway — this connects just the Ring contact.
2. INI File
In \Flair\FlairClassic\flair.ini (or equivalent), set:
3. Serial Devices Setup Window
| Setting | Value |
|---|---|
| Mode | TCP (NOT COM1, NOT UDP) |
| TC Comparator | Enabled |
| IP Address | 127.0.0.1 (or any value — appears to be ignored) |
| Port | 0 |
UDP halts timecode
If serial mode is set to UDP, timecode reading stops completely. Always use TCP.
4. Timecode Setup Window
| Setting | Value |
|---|---|
| TC Comparator | Enabled (check this box) |
| Frame rate (PAL/NTSC) | Match your timecode source (e.g. 25 for PAL) |
| TC Display | External |
| Base | Set to real TC base (e.g. 25), NOT zero |
5. External Camera Setup Window (if using camera record trigger)
- Sync source: select RT (or Network Board if sync is plugged into Ultibox)
- Connection: Not Connected (for TC use — COM1 is for sync, not TC)
6. Inputs Setup Window (TC trigger configuration)
| Setting | Value |
|---|---|
| Timecode base | Match your TC FPS (e.g. 25) |
| Timecode Speed FPS | FPS of the timecode being played |
| Move Start | Your desired part-run start frame / position |
| Robot Fast/Slow | Must match your intended run mode |
| Update Triggering | Click after every change |
Robot speed must match
If Robot Fast is enabled in Inputs Setup but you run the robot in Slow mode (or vice versa), the move will not trigger correctly.
7. Main Window — Copy Trigger Point
After clicking Update Triggering in Inputs Setup:
- The calculated Trigger Point value will appear in Inputs Setup.
- You must manually copy this value into the START box in the main Flair window.
- This value is the TC time at which Flair will start the robot's pre-roll — calculated to arrive at the programmed start point at the correct frame.
Record mode not required
Contrary to expectation, Flair does NOT need to be in Record mode for the TC trigger to fire a move. (Niko confirmed June 2020.)
8. Part Runs with TC
For part runs (starting the move from somewhere other than the beginning):
- Define your part run in the normal way.
- Set your desired start timecode in Move Start in Inputs Setup.
- Click Update Triggering — Flair calculates the pre-roll and shows the Trigger Point (the TC value at which to send the robot pre-rolling).
- Copy Trigger Point to the main window START box.
- Forward Run / Part Run the project, then play your TC source from a point before the Trigger Point.
- The robot will pre-roll and arrive at the start of the part run at the correct frame.
LTC Signal Quality Tips
- LTC into RT units is not robust (Simon Wakley) — signal splitting, ground imbalance, too loud/too quiet all cause failures.
- If signal is unreliable: try a wireless audio transmitter (Comtec or similar) — wireless adds electrical isolation and includes a volume control.
- A phone or tablet playing an LTC
.wavfile into the RT14 audio input works reliably (Niko) — electrically isolated from the robot. - LTC WAV files can be generated at elteesee.pehrhovey.net.
- For music video shoots: use a dual-channel audio feed where left channel = music, right channel = LTC.
References
- Flair Operator Manual — Inputs/Triggers section (Flair Classic — Ch.19 Inputs, Outputs & DMX: Inputs — p.281 · Flair 7 — Ch.16 Inputs, Outputs and DMX: Input Triggers — p.231)
- Flair Operator Manual — External Camera Setup / Serial Devices (Flair Classic — Ch.5 Setups: Serial Devices Setup — p.119 · Flair 7 — Ch.5 Setups: Serial / Data Output — p.78)
Official Documentation
Related Media
Media Text / Description
- Media 1: 2020-06-02 13:29 - Tom D: Hi guys, is anyone online (awake!) right now who has LTC in (timecode in) up and running through via the RT-14 into Flair. I’m not having any luck and want to make sure my timecode setup is...
WhatsApp Excerpts
- 2020-06-02 13:29 - Tom D: Hi guys, is anyone online (awake!) right now who has LTC in (timecode in) up and running through via the RT-14 into Flair. I’m not having any luck and want to make sure my timecode setup is correct. Trying to confirm correct settings in SERIAL DEVICES SETUP - by default Timecode was set to COM1 - though RT14 is an Ethernet connection...
- 2020-06-02 22:11 - Tom D: Ahhhh, “copy the trigger point value to the main screen” - didn’t realise I had to do that bit - I had wondered why main window TC Start box wasn’t updating automatically.
- 2020-06-02 23:07 - ~ Stafford (Staff) Wheaton: Here comes:
- 2020-06-02 23:07 - ~ Stafford (Staff) Wheaton: FLAIR/RT14 LTC TIMECODE INPUT SETUP CHECKLIST ____ WIRING RT14 pinout for SMPTE timecode LTC INPUT SLEEVE GND RING (RIGHT CHANNEL) TIMECODE IN TIP NC OR TIE TO RING ____ FLAIR INI FILE TCReader: RIC ____ TIMECODE SETUP WINDOW TC COMPARATOR PAL/NTSC TC DISPLAY EXTERNAL BASE BETTER TO USE AN ACTUAL BASE IE 25 FOR PAL ETC ____ EXTERNAL DEVICES SETUP WINDOW TIMECODE TC COMPARATOR TCP ONLY NEED TO...
- 2020-06-02 23:09 - ~ Stafford (Staff) Wheaton: Anything missed? 🤓
- 2020-06-02 23:11 - Tom D: In timecode setup window it was suggested to me TC generator should be ticked. Though I haven’t played with this setting.